conda的基础操作:
查询在线包链接:
https://anaconda.org/
https://pypi.org
#查询conda信息
conda info
#查看conda版本
conda -V
#升级conda
conda update conda
#升级anaconda
conda update anaconda
#查看当前环境python版本
python -V
#升级python
conda update python
#列出当前的所有环境
conda info -e
conda info --envs
#创建一个conda环境
conda create -n my_py_env python=3.6.2
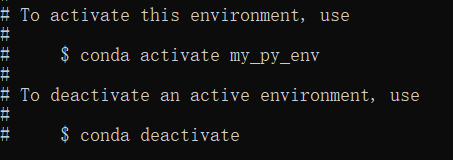
#激活环境
conda activate env_name
老版本的:
• Linux and macOS: source activate myenv_name
• Windows: activate myenv_name
#关闭当前环境
conda deactivate
#查询当前环境中的包列表
conda list
#删除指定的环境(有确认提示)
conda remove --name myenvs --all
#环境中安装指定版本包(不加版本号默认最新)
conda install numpy=1.13.3
pip install numpy==1.13.3
#从清华源安装tensorflow-gpu版本
pip install -U tensorflow-gpu -i https://pypi.tuna.tsinghua.edu.cn/simple (-U表示参数指定如果已安装此包,则执行升级命令。)
位于pypi.douban.com的存储库不是受信任的或安全的主机,正在被忽略。要求使用“–trusted host pypi.douban.com”允许此警告。
pip install keras -i http://pypi.douban.com/simple --trusted-host pypi.douban.com
#删除包(卸载包)
conda uninstall package_name
设置全局pip源
配置清华PyPI镜像(如无法运行,将pip版本升级到>=10.0.0)
pip config set global.index-url https://pypi.tuna.tsinghua.edu.cn/simple
阿里云源公网配置方法
pip config set global.index-url https://mirrors.aliyun.com/pypi/simple/
pip config list -v 列出正在使用的配置文件的位置
或者下面
a. 找到下列文件
1 | ~/.pip/pip.conf |
b. 在上述文件中添加或修改:
1 | [global] |
设置conda源
基本操作命令
1、Anaconda 查看安装源:
conda config --show-sources
2、Anaconda 添加安装源:
conda config --add channels https://mirrors.tuna.tsinghua.edu.cn/anaconda/pkgs/free/
3、Anaconda 删除安装源:
conda config --remove channels https://mirrors.tuna.tsinghua.edu.cn/anaconda/pkgs/free/
[
](https://blog.csdn.net/David_jiahuan/article/details/104544957)
切换第三方源
中科大源
conda config --add channels https://mirrors.ustc.edu.cn/anaconda/pkgs/main/
conda config --add channels https://mirrors.ustc.edu.cn/anaconda/pkgs/free/
conda config --add channels https://mirrors.ustc.edu.cn/anaconda/cloud/conda-forge/
conda config --add channels https://mirrors.ustc.edu.cn/anaconda/cloud/msys2/
conda config --add channels https://mirrors.ustc.edu.cn/anaconda/cloud/bioconda/
conda config --add channels https://mirrors.ustc.edu.cn/anaconda/cloud/menpo/
清华源
conda config --add channels https://mirrors.tuna.tsinghua.edu.cn/anaconda/cloud/conda-forge/
conda config --add channels https://mirrors.tuna.tsinghua.edu.cn/anaconda/pkgs/free/
conda config --add channels https://mirrors.tuna.tsinghua.edu.cn/anaconda/pkgs/main/
conda config --append channels https://mirrors.tuna.tsinghua.edu.cn/anaconda/cloud/fastai/
conda config --append channels https://mirrors.tuna.tsinghua.edu.cn/anaconda/cloud/pytorch/
conda config --append channels https://mirrors.tuna.tsinghua.edu.cn/anaconda/cloud/bioconda/
conda config --set show_channel_urls yes
阿里云源
Linux用户可以通过修改用户目录下的 .condarc 文件。
Windows 用户无法直接创建名为 .condarc 的文件,可先执行 conda config --set show_channel_urls yes 生成该文件之后再修改。位置在当前用户目录。
注:由于更新过快难以同步,我们不同步pytorch-nightly, pytorch-nightly-cpu, ignite-nightly这三个包。
1 | channels: |
即可添加 Anaconda Python 免费仓库。
配置完成可运行 conda clean -i 清除索引缓存。
移除某个源(不确定)
conda config --force --remove channels conda-forge
恢复默认源
conda config --remove-key channels
安装指定源的包
conda install --channel https://conda.anaconda.org/cjj3779 package_name
安装本地包
conda install --use-local pytorch-1.2.0-py3.5_cuda100_cudnn7_1.tar.bz2
python -m pip install --user xxxxxxx. whl
环境存在, 但是激活不了
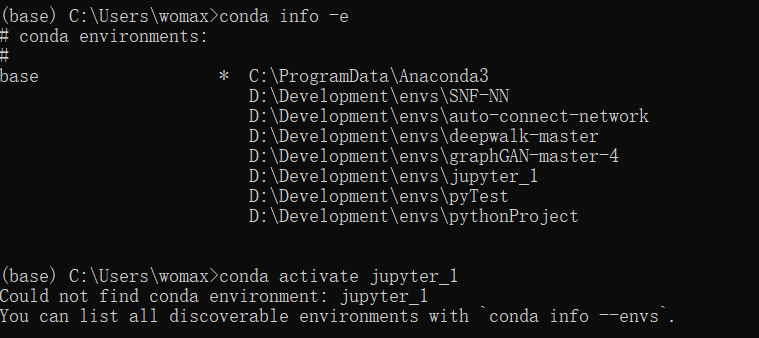
解决步骤 1. 查看环境目录 2.手动添加环境目录
查看环境目录 :
bash 输入下面命令:
conda config --show envs_dirs
pkgs_dirs
1
先查看你的路径中有没有安装环境的目录,这里的目录是指你的环境的目录。如果使用了 anaconda3 安装,相应的环境会在user_path/anaconda3/envs中,这里的 user_path 在 windows 中一般为C:\Users\xxx中,如果是 linux 则在你自己的用户根目录下,比如服务器的普通账号根目录如home/xxx。
手动添加环境目录:
如果没看到你的 anaconda3/envs 目录的话,手动添加即可。重要的是找到你所装的环境的位置(如果你不知道什么是环境直接理解为下一级目录有 bin, lib 等等的大目录)。上文说明了使用 anaconda3 所装环境的位置,如果你没有装 anaconda 只装了 conda 环境,则环境会装在你的用户根目录的".conda/envs"下面,pip 装的自行百度找到路径。bash 输入下面命令来手动添加路径
conda config --append envs_dirs D:\Development\envs
1
注意将你的路径替换掉"your_path",比如我有一个环境在”d:/a/b/"目录下,我直接conda config --append envs_dirs d:/a/b这样直接完成硬核添加(注意此时不是python.exe的上级目录而是上上级目录,因为上级目录代表的是虚拟的环境名称,除了base环境都如此)。但是一般无论 pip 还是 conda 都会把你的环境装到一个大的 envs 目录下面,你只要添加大的 envs 目录就行了。
手动删除环境目录:
如果你手残添加错了,那删掉就行了(不删也没什么,可别把别人的环境给删掉了),bash 输入
conda config --remove envs_dirs your_path
————————————————
版权声明:本文为CSDN博主「小舟逝江海」的原创文章,遵循CC 4.0 BY-SA版权协议,转载请附上原文出处链接及本声明。
原文链接:https://blog.csdn.net/qq_34769162/article/details/107691830
修改conda环境和缓存默认路径
https://blog.csdn.net/javastart/article/details/102563461
Anaconda代理设置
修改anaconda的配置文件,位置在user目录下.condarc文件,添加代理
1, 不使用验证密码
1 | proxy_servers: |
2,使用验证密码
1 | proxy_servers: |
再比如:
1 | channels: |